Lets get started, Remember to save often
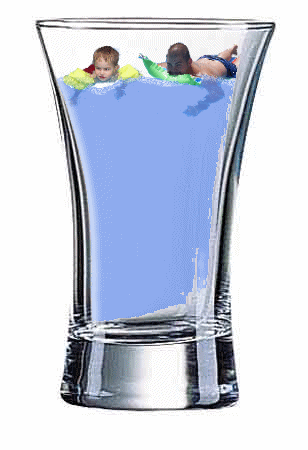
1. First download the supplies that I have included with this tutorial. You'll need one or two tubes of choice. I used
two water photos.
2. Open the cup and right click the layer and duplicate it twice. Name the first one number 1 and the
other cutout. Grab your magic wand tool, and make sure that you are on your layer titled 1, with tolerance set at
18 select inside the cup. Pick a nice blue color or which ever color that you'd like in your cup. Flood fill it
with your selected color. While still selected, click on your cutout layer flood fill again and then add
a cutout effect. Effects/3d effects/ cutout with these settings vertical - 4 horizontal - 6 opacity - 50 and blur at
8. Selections/none.
3. Duplicate this layer 3 times to have a total of 4 layers. Rename your layers top to bottom, cutout,
1, 2, 3, and 4 and background will be at the bottom. Some of the layers I have already told you to rename, and that is okay. Change
the opacity to 72 of the layers titled 1, 2, 3, and 4 to make them partly see thru.
4. X out layer 4, 3, and 2 so that we can work with layer 1.
5. Grab your free hand tool and put the settings on freehand, mode add. Now this is the hardest part, we are going to
make a section of just the top portion of the cup and make it look like the liquid is moving. So you'll want to go in a up
and down motion while moving from one side of the cup to the other and then go around the top section of the liquid. When
you are satified with what you've got hit the delete key on your keyboard. The selection will now disapear.
6. Hide that layer and unhide the number 2 layer and do the same make sure to make it different that way the water will
move when we animate.
7. Do the same to the other 2 layers titled 3 and 4.
8. X out the layers 2, 3, and 4 and we are gonna work with 1 again.
9. Grab your brush tool and use these settings
Shape - Default circle
Size - 1
hardness - 100
step - 25
density - 40
thickness - 100
opacity - 93
color - little bit darker color than the previous color.
10. Now moving kinda quickly, go across the top part of your liquid, leaving dark color dots. Work with that
until you are satified and do the same to each layer. Unhide all layers. Next add your tubes on new seperate layers and
place them both under the number 1 water layer, to put them behind the water. Now you may want to erase part of the water
that covers a little part of your tube, that is okay I did the same. Also I used the deformation tool to rotate
my tubes slightly each water layer to make the tubes animate also. Add your water mark on a new raster layer and or anything
else that will embelish your creation on new raster layers.
11. Now for the animation part of the tut. Hide 2, 3, and 4 and copy merged
12. Paste as new animation in animation shop
13. Go back to psp and hide 1 and unhide 2, leaving 3 and 4 hidden still. Move your tubes under the number 2 water
layer to but them behind the water again, erase any small parts that may cover your tube. Don't forget to rotate your
tube slighty to make it differnet from the last frame. Copy merged.
14. Paste in AS after current frame. Do the same to 3 and 4 making sure to move your tubes undernieth each water layer
that you are on and then rotating them slightly each time, and then go to edit/select all and go to frame properties
and change the settings to 35 and vwa-lah. You are done.